The kw build command is a versatile tool that encompasses everything related
to building and managing Linux kernel images. It supports various options, such
as displaying build information, invoking kernel menuconfig, enabling
ccache, adjusting CPU usage during compilation, saving logs, and using the
LLVM toolchain. Additionally, it provides options for cleaning the build
environment, customizing CFLAGS, and compiling specific commits. The
command also offers alert notifications and verbose mode for detailed debugging
information.
Overcoming the Initial Challenges in kw build Integration Testing
One of the main challenges I’ve encountered while building integration tests
for kw build was the significant time required to compile the kernel, a
notoriously time-consuming task. I configured the integration tests to be
triggered on pushes and pull requests. However, as the number of tests
increases, the execution time on GitHub Actions’ CI also grows, which
eventually will become impractical. The primary reason for this was that the
tests were executed across three different distributions (Debian,
Fedora, Arch Linux). This meant that each test had to be run in all
three distros, which overloaded the execution time.
Given the limitations of the machines available on GitHub Actions, which
are not robust enough to handle the workload required to compile the kernel in
three distinct environments, the best decision at the time was to limit kw
build integration tests to just one distro. It was implemented a function
that randomly selects one of these three distros for each test run. This allows
us to test kw build in different environments while significantly reducing
the time and resources consumed by CI.
Structured Testing Approach with Podman and shUnit2
The integration testing framework for the kw build feature is built using
Podman Containers, which allows us to simulate different environments in an
isolated and controlled manner. To ensure that the functionalities of kw
build are thoroughly tested, the shUnit2 framework is used, providing a
solid foundation for writing and running shell script tests efficiently.
As mentioned in the introductory post about integration testing, shUnit2 offers “magic” functions that simplify the organization and execution of tests. For more details about these features, check out the dedicated post.
Initial Environment Setup: oneTimeSetUp()
Before executing any tests, it’s crucial to correctly set up the environment to
ensure everything is in order. For the integration tests of kw build, this
setup is managed by the oneTimeSetUp() function. This special function is
designed to run once before any test functions (i.e., any function prefixed
with test_). It ensures the test environment is properly configured by
selecting a random Linux distribution, cloning the mainline Kernel
repository, and installing the necessary dependencies. Here’s a detailed look
at how this setup is accomplished:
1 | |
This method not only prepares the test environment but also establishes a solid foundation for the subsequent tests to be executed efficiently.
Per-Test Environment Setup: setUp()
The setUp() function plays a crucial role in setting up the test environment,
but with a different approach compared to the oneTimeSetUp(). While
oneTimeSetUp() handles tasks that need to be executed only once before all
tests, such as setting up the base environment and cloning the mainline kernel
repository on the host machine, setUp() is called before each individual test.
It contains the sequence of tasks that need to be done before every test in the
test suite (in this case, the kw build integration test suite).
1 | |
Auxiliary Function: setup_kernel_tree_with_config_file()
This function copies the mainline kernel repository to the container, using the temporary path created earlier. This happens once the repository has been cloned on the host machine, optimizing the process for when it’s necessary to implement tests for the three different distributions, allowing the kernel to be cloned only once instead of three times.
This approach saves time and resources, especially considering that cloning the entire mainline kernel repository can be time-consuming.
To ensure that the cloning process is quick and efficient, we opted to clone only the 5 most recent commits from the mainline kernel repository. This is done using the following command:
1 | |
This approach allows testing the most recent changes without the overhead of downloading the entire repository history, saving time and resources.
1 | |
Auxiliary Function: optimize_dot_config()
This function is then called to configure and optimize the kernel .config file
based on the modules loaded by the Podman container.
1 | |
Final Test Cleanup: oneTimeTearDown()
The oneTimeTearDown() function is responsible for cleaning up the test
environment after all test functions have been executed.
1 | |
This cleanup is crucial to maintaining a consistent test environment and avoiding potential conflicts or failures caused by residual files.
Per-Test Cleanup: tearDown()
The tearDown() function plays a crucial role in ensuring that the test
environment is restored to its initial state after each test function is
executed. This is especially important when a test might modify the state of
the mainline kernel repository within the container. To prevent these
modifications from affecting subsequent tests, it is necessary to clean up and
restore the environment.
1 | |
The command kw build --full-cleanup executed by tearDown() uses the
--full-cleanup option, which internally runs the make distclean command. This
restores the build environment to its initial or default state by removing all
files generated during the build process, including configuration files and
script outputs. This thorough cleanup ensures that any configuration or
modification made during the test is removed, allowing each subsequent test to
start with a clean and consistent environment, which is essential for the
integrity of the tests.
Practical Examples and Testing Scenarios
Testing kw build Default Functionality
Let’s delve into more details about the standard test for the kw build tool.
1 | |
The test_kernel_build() function performs several checks to ensure that the
kernel build inside the container was successful.
I will break down this test code into parts and explain the flow.
1 | |
First, the kw_build_cmd variable stores the kw build command, which is the
tool being tested. Then, the command is executed inside the container using the
container_exec() function. In this case, the function will navigate to the
mainline kernel repository directory (located at KERNEL_TREE_PATH_CONTAINER
and run the build command.
The output of this command is redirected to /dev/null to avoid interfering
with the test log.
Verifying the Return Value $?
The check for the return value $? of the kw build command is performed
immediately after execution with the assert_equals_helper function. If the
return value is not zero, indicating a failure, the test fails generating the
error message kw build failed for <container>
Verifying the Build Status in the Database
1 | |
After the execution of the kw build command, the next step is to verify
whether the kernel build process was correctly recorded in the kw.db
database. This database is where kw stores logs and statistics about
executions. The container_exec function is used again to execute an SQL
command within the container, retrieving the most recent log from the
statistics_report table.
The statistics_report table contains detailed information about each build
performed, including the build status and the final result. For example:

1 | |
The data retrieved from the database is processed to extract the build status
and result. Using the cut command, the build status is extracted from the
second column of the log, and the final result from the third column.
These values are then compared with the expected ones. The status should be
equal to build, indicating that the build process was started and recorded
correctly. The final result should be success, confirming that the build was
completed successfully.
Testing kw build with –cpu-scaling option
The --cpu-scaling option of kw build allows you to control how much of the
CPU capacity should be used during the kernel compilation. For example, if
you want the compilation to use only 50% of the CPU cores to avoid
overloading your system while performing other tasks, you can use the command:
1 | |
In rough terms, this option adjusts the percentage of the CPU the kernel compilation will use, allowing you to balance the compilation performance with the overall system load.
Testing this functionality of kw build differs from others because we don’t
need to compile the kernel completely to verify if the --cpu-scaling option
works as expected. The goal here is to check if the CPU is indeed being
used in the defined proportion (in this case, 50%). The testing approach is as
follows:
1 |
|
Note that kw_build_cpu_scaling_monitor is called as a program/function
defined in the container. So, before starting the containers, we install
kw_build_cpu_scaling_monitor using a Containerfile for each supported Linux
distribution (Debian, Fedora, and Archlinux). Using the Debian
distribution as an example, here’s how the test is configured in the
Containerfile_debian:
1 | |
For context, the kworkflow project directory structure is as follows:
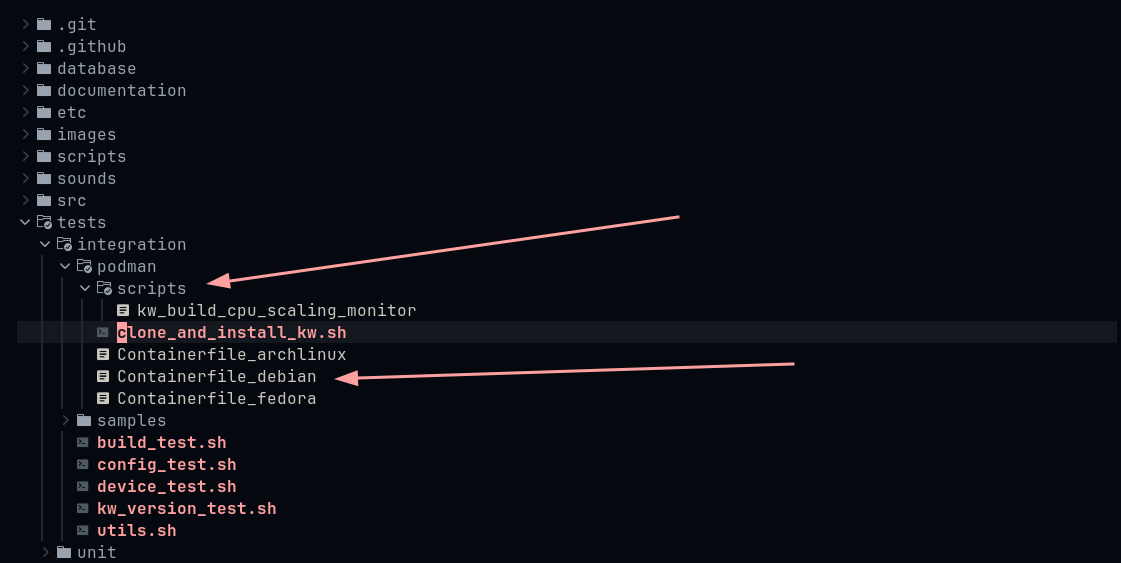
The goal is to copy all scripts from the scripts/ folder, such as
kw_build_cpu_scaling_monitor, into the container. By creating specific
scripts and copying them to the container’s /bin directory, we can execute them
directly as commands.
With this in mind, let’s examine the script that tests the --cpu-scaling
feature. The main idea is to calculate the CPU usage while the kw build
--cpu-scaling 50 command is running to check if the feature is functioning
correctly.
To analyze the code inside the kw_build_cpu_scaling_monitor script, let’s
break it down into parts.
1. Introduction and Initial Setup
First, we define the essential arguments and variables for the script. This
includes the --cpu-scaling option, which determines the percentage of CPU to be
used, and the kw build command to be monitored.
1 | |
2. CPU Usage Monitoring
In this section, we monitor the CPU usage during the execution of kw build.
We use a function that collects data from the CGROUP filesystem,
calculating the average CPU usage based on the following formula:

1 | |
3. CPU Usage Average Calculation
Here, the calculate_avg_cpu_usage() function reads the collected values and
calculates the average CPU usage during the build proces
1 | |
4. Verification and Validation
In this step, we compare the average CPU usage obtained with the expected value (in this case, 50%). It’s important to consider an acceptable error margin in this comparison. CPU time may vary due to several factors such as warming up, context switching, and other system activities. These variations can influence the results, so allowing for a small margin of error helps avoid flaky tests. If the average CPU usage falls outside this margin, the test will fail, ensuring that we account for any variability in the CPU performance.
1 | |
5. Cancel Build Process
To prevent the build process from continuing after monitoring, the script
terminates all related build processes using pstree to find all subprocesses.
1 | |
6. Script Execution
Finally, the script runs the kw build command in the background, monitors CPU usage, calculates the average, checks if it is within the error margin, and cancels processes at the end.
1 | |
Validating the workflow with assert_equals_helper
Returning to our cpu-scaling option test function:
1 |
|
The test runs inside a container, where the script monitors CPU usage while kw
build --cpu-scaling 50 is executed. The check_cpu_usage function compares
the average CPU usage with the expected value and, based on this, returns 0
(success) or 1 (failure). The result is then verified by
assert_equals_helper, ensuring that the behavior is as expected.
With this, we conclude the validation of the CPU scaling feature. If the
check_cpu_usage() function returns 0, the test is considered successful,
validating that the CPU scaling functionality of kw build is working correctly.
Conclusion
kw build is one of the core features of kw, so integration testing for it is
crucial to ensure the tool’s robustness and reliability, especially when
dealing with different environments and various configuration options. The
adoption of Podman Containers and the shUnit2 framework allowed for a
structured and efficient approach to these tests. Additionally, optimizing the
testing environment and rigorously checking results ensure that kw build
continues to function as expected, even under varying conditions. Adjusting the
test execution strategy to reduce time and resource consumption was a critical
decision for the project.
Furthermore, the foundational work on the infrastructure for testing kw build
has been laid. This will facilitate future expansions of the testing suite,
making it easier to test other feature workflows and ensure comprehensive
coverage across the tool.